- For PC
- For MAC
- For Linux
- OS: Windows 10 (64 bit)
- Processor: Dual-Core 2.2 GHz
- Memory: 4GB
- Video Card: DirectX 11 level video card: AMD Radeon 77XX / NVIDIA GeForce GTX 660. The minimum supported resolution for the game is 720p.
- Network: Broadband Internet connection
- Hard Drive: 23.1 GB (Minimal client)
- OS: Windows 10/11 (64 bit)
- Processor: Intel Core i5 or Ryzen 5 3600 and better
- Memory: 16 GB and more
- Video Card: DirectX 11 level video card or higher and drivers: Nvidia GeForce 1060 and higher, Radeon RX 570 and higher
- Network: Broadband Internet connection
- Hard Drive: 75.9 GB (Full client)
- OS: Mac OS Big Sur 11.0 or newer
- Processor: Core i5, minimum 2.2GHz (Intel Xeon is not supported)
- Memory: 6 GB
- Video Card: Intel Iris Pro 5200 (Mac), or analog from AMD/Nvidia for Mac. Minimum supported resolution for the game is 720p with Metal support.
- Network: Broadband Internet connection
- Hard Drive: 22.1 GB (Minimal client)
- OS: Mac OS Big Sur 11.0 or newer
- Processor: Core i7 (Intel Xeon is not supported)
- Memory: 8 GB
- Video Card: Radeon Vega II or higher with Metal support.
- Network: Broadband Internet connection
- Hard Drive: 62.2 GB (Full client)
- OS: Most modern 64bit Linux distributions
- Processor: Dual-Core 2.4 GHz
- Memory: 4 GB
- Video Card: NVIDIA 660 with latest proprietary drivers (not older than 6 months) / similar AMD with latest proprietary drivers (not older than 6 months; the minimum supported resolution for the game is 720p) with Vulkan support.
- Network: Broadband Internet connection
- Hard Drive: 22.1 GB (Minimal client)
- OS: Ubuntu 20.04 64bit
- Processor: Intel Core i7
- Memory: 16 GB
- Video Card: NVIDIA 1060 with latest proprietary drivers (not older than 6 months) / similar AMD (Radeon RX 570) with latest proprietary drivers (not older than 6 months) with Vulkan support.
- Network: Broadband Internet connection
- Hard Drive: 62.2 GB (Full client)
The Hardest Day
By the summer of 1940, the situation for the allies looked grim. German forces had advanced steadily through Poland, Holland and Belgium to then defeat France, and the Norwegian Campaign had seen a further major victory for the Third Reich. With Russia and the United States yet to become fully involved in the war against Germany, Britain stood alone to oppose the might of Hitler’s advancing forces.
Whilst the Royal Navy held a significant advantage over the German Kriegsmarine after notable victories in Norway, the British army and Royal Air Force had suffered significant losses in both Norway and France. With German forces now poised on the coast of Northern France, Britain steeled itself for the invasion it felt was sure to follow.
Hitler was well aware that a channel crossing would be nearly impossible to achieve, given the clear advantage held by the Royal Navy. Historians still debate whether Hitler ever truly planned to invade Britain or whether his actions were meant to beat Britain into submission; either way, the Luftwaffe was ordered to achieve air supremacy by eliminating RAF Fighter Command. The desperate battles which took place in the skies over Britain and the English Channel were proactively dubbed ‘The Battle of Britain” in an address by Winston Churchill on June 18th, 1940; the battle itself is now acknowledged to have taken place between July 10th and October 31st.
The first phase of the battle began with probing attacks against selected targets in an endeavor to draw the RAF out to fight in the air, whilst the main might of the Luftwaffe was deployed and prepared for the major offensive itself. This consisted largely of attacks against channel shipping and large scale fighter sweeps intended to draw British aircraft up to fight.
The second phase began on August 13th when Luftflotten 2,3 and 5 began a series of massive air attacks aimed at RAF air bases and the vital network of radar installations which provided them with the critical early warning of impeding attack. The Luftwaffe had at this time an average of 3306 serviceable aircraft; of this number, 839 were single engine fighters, 282 twin engine fighters, 336 Stukas and 981 bombers. Opposing this, the RAF could muster 675 fighters (please note these figures are subject to significant change depending on the source quoted). By August 15th, the pace of operations for both the RAF and the Luftwaffe had increased significantly – RAF Fighter Command flew 974 sorties on that day alone, with the Luftwaffe flying 2199 sorties. However, it would be August 18th which would come to be known as ‘The Hardest Day’.
Around midday on August 18th, Luftflotte 2 launched a huge series of attacks which would make up a significant proportion of the 850 or so sorties launched by the Luftwaffe on that day. The crucial sector airfields of RAF Biggin Hill and RAF Kenley, both situated in the strategically vital 11 Group in the South East of England, were targeted. A force of some 60 Heinkel 111s of KG1 were tasked with attacking Biggin Hill, whilst the responsibility of striking Kenley fell to the 48 Junkers 88s and Dornier 17s of KG76. An advance force of Me109s swept ahead of the main raid, whilst Me109s and Me110s also provided a more direct escort. The attacking wave consisted of some 108 bomber and 150 fighters.
The majority of the inbound raid was detected by Britain’s radar network. No.501 Squadron’s 12 Hurricanes were already airborne and were shortly joined by another 8 squadrons scrambled from 11 Group’s airfields. Just short of 100 Hurricanes and Spitfires were now moving to intercept the attack or defend the vital British airfields. As the first encounters were taking place, 7 Dornier 17s of 9/KG 76 mounted a daring low level raid against Kenley, having initially slipped beneath British raid and only been detected once they had coasted in. The Dorniers wreaked havoc across Kenley, destroying three of the four main hangars and the station operations room. However, only two damaged Dorniers managed to crawl back to their home airfield after being attacked by Hurricanes of No.111 Squadron and ground fire.
Meanwhile, in the airspace in the vicinity of Biggin Hill, a huge dogfight was developing between 25,000 and 30,000 feet. No.615 Squadron’s Hurricanes were bounced by Me109s of JG3; however, the ensuing combat allowed No.32 Squadron’s Hurricanes to smash into the main bomber force. The head on attack succeeded in breaking up the entire formation of Dorniers, forcing some to select new targets or abandon their attack entirely. Escorting Me110s joined the fight, shortly followed by 8 Spitfires of No.64 Squadron.
By this time the Ju88s of KG76 had arrived at Kenley but found their target obscured by smoke from the damage caused by the earlier low level attack. Whilst maneuvering into position, they too were attacked by RAF fighters. Simultaneously, KG1’s Heinkel 111s were approaching Biggin Hill. Escorting 109s broke away to intercept approaching Spitfires of No.615 Squadron, succeeding admirably in keeping the British fighters at bay to allow the bombers a clear run to the target. Unfortunately for the German aircrew, their losses were in vain as the Biggin Hill raid only managed to damage the station golf course. As a result of breaking up the German bomber formations, the airfields at Croydon and Manston were also attacked as secondary targets. Now, with the German raiders turning for home and the fighter escorts running low on fuel, the 109s were more vulnerable to attack. A further wave of 109s was sent to protect the retreating German force, but this took heavy losses. 12 Me109s were lost during the encounters, as well as 8 bombers. However, it was the severely outclassed Me110s which took the brunt of the beating, losing between 12 and 15 aircraft. RAF losses amounted to between 17 and 19 fighters during the early afternoon encounters.
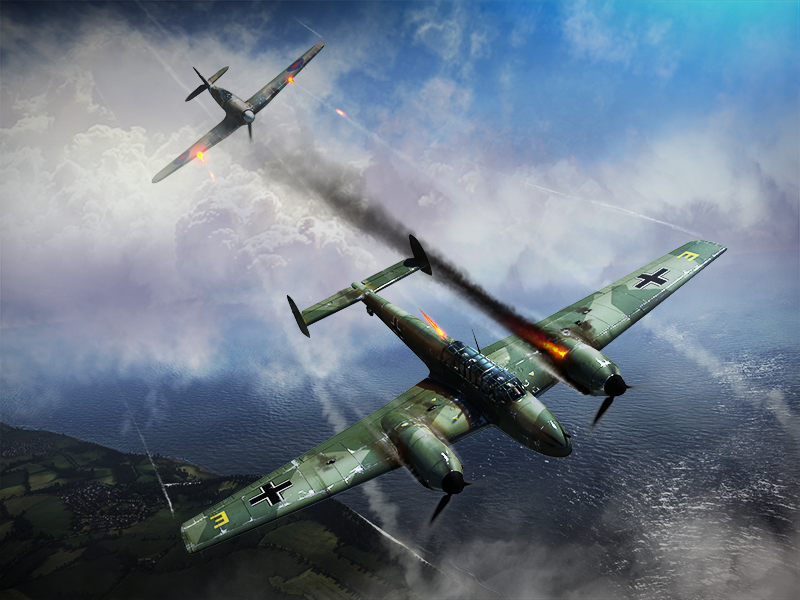
Luftflotte 3 were the next to enter the fray with over 100 Junkers 87 Stukas of StG77and StG3. The dive bombers launched to attack airfields at Thorney Island, Gosport and Ford, as well as targeting Poling radar station, escorted by 157 Me109s of JG2, JG27 and JG53. After underestimating the size of the raid, only 68 British fighters were scrambled to intercept. 3 British fighters were destroyed on the ground by the Me109s which had swept ahead of the main force. Poling radar station suffered heavy damage from the Stukas as the escorting Me109s struggled in combat to defend them against attacking Spitfires from No.234 Squadron, with three German fighters being shot down for no loss to the British. The remaining Stuka formations were not so fortunate, being attacked by British fighters before their escort could intervene. Some 300 aircraft swirled in a huge dogfight in the ensuing melee whilst the Stukas still continued to bomb their assigned targets under fire from enemy fighters and AA. The Stukas were no match for the British fighters, with different sources quoting between 15 and 18 of the dive bombers being destroyed. The losses were so heavy that all Stuka Wings were withdrawn from the battle entirely. In addition to this, six Me 109s had been destroyed. Whilst the RAF had lost only five fighters during the encounter, over 20 aircraft had been destroyed on the ground and another gap had now appeared in Britain’s critical radar network.
The day was still far from over. By early evening, Luftflotte 2 had reassembled and was ready for another strike. The final big push against Fighter Command came in the form of 58 Dornier 17s of KG2 and 51 Heinkel 111s of KG53, attacking RAF Hornchurch and RAF North Weald respectively. Escorting them were 140 German fighters. 13 Squadrons of Hurricanes and Spitfires were scrambled from 11 Group to intercept, with a further four sent to assist from 12 Group to the North. British fighters tore through the ranks of KG53’s Heinkels, scattering the raid and forcing many of the German bombers to jettison their payloads and flee. Escorting fighters were involved in heavy fighting, with critical losses again suffered amongst the outclassed Me110s. Whilst only four Heinkel 111s were lost, seven Me110s fell to the guns of the British fighters. KG2 met with less resistance thanks to their escort managing to keep the British fighters occupied, but were unable to cause significant damage to their targets due to poor weather.
Whilst the Luftwaffe continued to launch raids over Britain after dark, the brunt of the fighting on August 18th was now over. Actual statistical analysis of the achievements of both sides varied hugely, not only at the time but also today, even after many historians have researched the events of the day’s fighting. In terms of aircraft losses, aviation historian Mike Spick states that the Luftwaffe lost 18 Me109s and 17 Me110s, as well as 18 Ju 87 Stukas. Estimates of a further 12 medium bombers can also be added to Spick’s figures. He goes on to quote RAF losses of 26 Hurricanes and 5 Spitfires, although perhaps more importantly for Fighter Command, only 10 pilots were killed from these 31 aircraft losses at a time when replacing personnel was far more difficult than bringing in replacement fighters.
However, the Luftwaffe’s objective was to destroy the RAF on the ground as well as in the air and in that respect they had achieved other notable successes throughout the day. Whilst many of the Luftwaffe’s attacks were well executed, these successes were blunted in some respects due to failures on the part of Luftwaffe Intelligence in the target selection which the aircrews had been allocated; the Luftwaffe was, after all, attempting to achieve air supremacy by wiping out RAF Fighter Command and most of the aircraft destroyed on the ground on August 18th belonged to RAF Coastal Command or the Royal Navy’s Fleet Air Arm. The propaganda machines of both nations claimed approximately double the successes they had actually achieved in terms of aircraft destroyed, whilst also only admitting to about half the losses suffered. However, both sides had experienced their greatest losses in a single day for the entire campaign, leading to August 18th later being dubbed ‘The Hardest Day’. But from the pilots’ point of view, RAF Fighter Command had succeeding in shooting down approximately double the number of aircraft that had been lost in the air - but whilst these numbers were to some extent evened out by ground losses, Fighter Command were on the way to proving to the world that the German war machine could, and would be defeated. Whilst there is still debate of whether Germany ever did really have the men and equipment to pose a serious threat of invasion to Britain, there is absolutely no doubt that ‘The Few’ men of RAF Fighter Command achieved an astounding moral victory by proving to the world that Hitler’s Germany was far from invincible.
 |
About the author:Mark Barber, War Thunder Historical ConsultantMark Barber is a pilot in the British Royal Navy's Fleet Air Arm. His first book was published by Osprey Publishing in 2008; subsequently, he has written several more titles for Osprey and has also published articles for several magazines, including the UK's top selling aviation magazine 'FlyPast'. His main areas of interest are British Naval Aviation in the First and Second World Wars and RAF Fighter Command in the Second World War. He currently works with Gaijin as a Historical Consultant, helping to run the Historical Section of the War Thunder forums and heading up the Ace of the Month series. |